Get Morphyre Free

This is a page from the Morphyre Pro Online Manual. You can return to the Contents Page, or go to the Morphyre Pro Homepage.
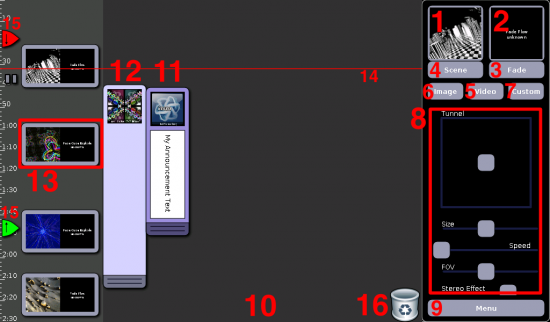
Morphyre Pro Manual Mode
Manual mode lets you fully customise a playlist of visuals, which can be saved for future use. You can drag your chosen scene and fade (displayed in the top right) onto the timeline on the left and add announcements and overlays to the panel in the middle. Each item is displayed when the red line reaches it as it passes down the timeline.
1. Selected Scene
This shows the currently chosen scene. Tap it to bring up a new scene at random or use the Scene (4), Video (5) or Image (6) Buttons to customise your own scene.
Drag the currently chosen scene over to the timeline on the left and a new event (15) will be added where you let go of your finger. Each event has an image of a chosen scene and fade (15). You can replace the chosen scene simply by dragging a new scene over from your selection in the top right.
2. Selected Fade
This shows the currently chosen fade (fades are the transitions between scenes). Tap it to bring up a new fade at random or use the Fade Button (3) to choose a particular fade.
Drag the currently chosen fade over to the timeline on the left and a new event will be added where you let go of your finger. Each event has an image of a chosen scene and fade. You can replace the chosen fade simply by dragging a new fade over from your selection in the top right.
3. Fade Button
This button changes the currently chosen fade (2). It brings up the Fade Menu.
4. Scene Button
This modifies the currently chosen scene (1). It brings up the Scene Menu.
5. Video Button
This changes the currently chosen scene (1) to one which contains a custom video you have added to Morphyre. It brings up the Video-Scene Menu. To see how easy it is to incorporate your own videos into Morphyre see Custom Images and Videos.
6. Image Button
This changes the currently chosen scene (1) to one which contains a custom image you have added to Morphyre. It brings up the Image-Scene Menu. To see how easy it is to incorporate your own images into Morphyre see Custom Images and Videos.
7. Custom Button
This changes the currently chosen scene (1) to one of your customised scenes (or lets you make one). It brings up the Custom Scene Menu where you can choose an existing custom scene or click 'New' to create a new one.
8. Tweak Area
This is a scrollable area containing Scroll bars and Boxes that lets you dynamically change aspects of the currently displaying scenes, such as the direction a tunnel is moving or the size of the 3D object in the scene. See the Tweaks Menu for more details.
9. Menu Button
This takes you to the Main Menu where you can choose to switch to Automatic Mode, adjust the resolution of the graphics, save or load a playlist, or shut down Morphyre.
10. Overlay Selection Area
Tap on this grey area to add an overlay or an announcement. This will bring up the Overlay Menu.
11 & 12. Announcement & Overlay entries in Timeline
These are examples of an Announcement and an Overlay added to the timeline. They are added by tapping on the Overlay Selection Area (9) and you can add as many as you like up to the width of the Overlay Selection Area.
The Announcement or Overlay will be displayed for as long as the red line is over the entry. You can lengthen or shorten the the time the Announcment or Overlay is displayed by dragging the grey tab at the bottom of the entry. To remove the Announcement or Overlay entry drag it to the wastebasket.
13. Scene and Fade Combination in timeline
This is an example of a scene and fade combined entry in the timeline. Create it by dragging a selected scene and fade from the top right had corner (1) and (2). If you only select a scene, a random fade will be selected for you.
14. Red Line
The Time-Scale at the far left of the screen marks out the time in seconds. The Red Line runs down the touchscreen as time progresses. It can be started and stopped by clicking the play/pause button at the far left hand side of it. When the red line reaches an entry (such as an announcement or a new scene) that entry appears on your display.
15. Time-Markers
You can slide these markers up and down the Time-Scale by dragging on them. Double-click the markers to re-start the Red Line (14) at the position of the Red marker. When the Red Line reaches the Green marker, it will automatically start at the Red marker again. This allows you to replay sections of your timeline easily.
16. Wastebasket
Delete unwanted entries on the timeline by dragging them over to the wastebasket and releasing them over it.